Where in the directions for scan does your setup differ from the following:
- Click on the [Start] button, click on [Programs] or [All Programs], click on [Xerox], click on [Network Scan], and then click on [Network Scan] again. The Xerox Network Scan Manager window will be displayed.
- Click on the [Add Device] button or double-click on the [Add Device] icon. The Add Device Wizard window will be displayed.
- Click on the [Next] button. The Specify a Network Scanner window will be displayed.
- Select [Browse for a scanner (recommended)], or select [Connect to this scanner] and enter the IP address of the machine. If the Network Scan program is unable to find the machine on the network, verify that the machine can communicate with the computer that the Network Scan program is installed on. Try to ping the machine from the computer.
NOTE: Below are examples of network configurations that could block the discovery of the machine by the Network Scan program. Contact your Network or System Administrator for assistance if it is found that any of these configurations are preventing the installation of the machine.- Third party Firewalls/Antivirus (either physical hardware or software) programs installed on the computer (blocking SNMP traffic or connections to other IP devices).
- The machine is on a different network than the computer is currently connected to (for example, the printer has a 192.168.1.x address and the computer has a 192.168.2.x address).
- The computer is using a VPN (Virtual Private Network) connection to work from a remote office to a large corporation/company. (If you are running a VPN connection on your computer, save all open work, disconnect from the VPN and try to add the machine again to the Network Scan program.)
- Click on the [Next] button. A list of available scanners on the network will be displayed.
- Select the required scanner from the list.
- Enter a name for the scanner in the Network Scanner Name field. By default the name is automatically populated; however, this name can be modified.
- Enter a User ID in the ID field.
NOTE: Up to eight characters can be entered for the User ID. The first character of the User ID must be a letter. - Enter a four-digit Personal Identification Number (PIN) in the PIN field. If you do not want to be prompted for a PIN when Scanning to a Network Client at the machine's Control Panel, enter 0000 in the PIN field.
- Enter the PIN again in the Confirm PIN field.
- Click on the [Next] button. The Congratulations window will be displayed.
- Click on the [Finish] button. The machine will be added to the Network Scan program.
Configure the Network Scan Program Defaults
- If the Network Scan program is not already open on the computer, perform the following:
- Click on the [Start] button.
- Click on [Programs] or [All Programs].
- Click on [Xerox Network Printer Utilities].
- Click on [Network Scan].
- Click on [Network Scan] again. The Xerox Network Scan Manager window will be displayed.
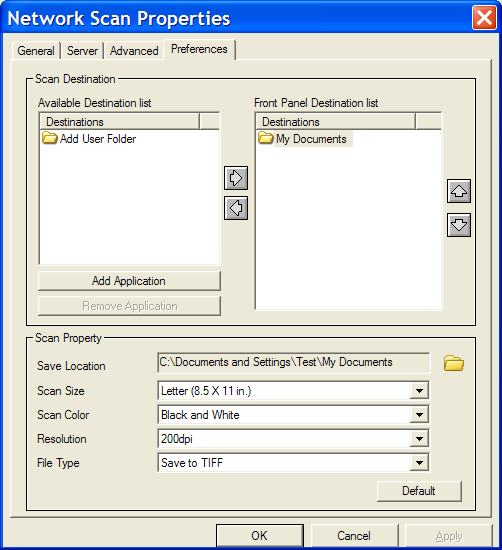
- Click on [Xerox WorkCentre 3210] or [Xerox WorkCentre 3220], and then click on the [Preferences] tab.
The Following options are available in the Network Scan program:- The Destinations section on the right lists what will be available from the WorkCentre 3210/WorkCentre 3220.
NOTE: "My Documents" cannot be removed but its destination (Save Location) can be changed.- Click on [Add User Folder], and then click the [right arrow].
- Click on the folder icon on the right to add a Folder Location. Give it a name that will be seen from the Display Screen on the WorkCentre 3210/WorkCentre 3220.
- Click on [OK].
- Modify the default scan properties, if necessary.
- Repeat steps a - e for all folders required.
- Save Location: Select the folder under you wish to modify under Destinations first followed by clicking on the [Folder] icon to the right of Save Location to browse to new location. Select the new folder, and then click on [OK].
- Scan Size:
- Letter (8.5 x 11 in.) - default
- Legal (8.5 x 11 in.)
- Statement (5.5 x 8.5 in.)
- A4 (210 x 297 mm)
- A5 (148 x 210 mm)
- B5 (182 x 257 mm)
- Scan Color:
- Black and White - default
- Grayscale
- True Color
- Resolution:
- 100 dpi
- 200 dpi – default
- 300 dpi
- File Type:
- Save to TIFF – default
- Save to PDF
- The Destinations section on the right lists what will be available from the WorkCentre 3210/WorkCentre 3220.
